In this article, we will go through step by step all the actions you can take to receive push notifications in Lumiform.
There can be several reasons why push notifications for upcoming events in Lumiform are not showing up on your mobile device. In this article, we will go through step by step all the actions you can take to receive push notifications in Lumiform.
This article includes the following chapters
-
Settings for Android User
-
Settings for iOS User
-
Settings for Lumiform Mobile App
-
Settings for Lumiform Desktop App
-
Settings for your schedules in Lumiform Desktop App
First, please note the distinction between our Android and iOS app. So first check which operating system you are using.
For Android users, check Android settings:
First, check if push notifications are enabled on your Android device.
To do this, go to Settings > Notifications and generally allow push notifications.
Make sure that you have enabled all notifications specifically for the Lumiform app when you go to Apps & Notifications > See all Apps > App Info / Lumiform > Notifications (show notifications Toggle should be on).
Pro tip: You can set App Reminder for Lumiform notifications in your settings in the Android device so that if inspectors have clicked away an inspection but have not yet conducted it, they will be reminded again of the upcoming inspection.
Please make sure you have at least Lumiform App version 1.3.2 installed on your tablet or phone. To verify that you have at least this version installed, go to Play Store > My apps & games > Installed > Lumiform. Under "About this app" you will see the installed version at the bottom.
Pro Tip: To stay up to date and make sure you get all the new features and bug fixes, enable auto-update for the Lumiform app.
For iOS users, check iOS settings:
We are currently working on push notifications for iOS users. This feature is not available at this time.
We recommend using SMS and/or email notifications as a temporary substitute. You can find out where to find these notification types in Lumiform in the desktop section.
Now that you've made sure notifications work on your mobile device in general, let's see that you have notifications enabled in Lumiform.
Check settings in Lumiform Mobile App.
-
Pick up your phone or tablet and open the Lumiform Mobile App.
-
Open the menu on the top left (burger icon) and click on "Profile".
-
You will find a toggle at the very bottom of the page asking "In use". Please make sure that this toggle is active.
Click on "Save"
Check settings in Lumiform Desktop App
-
Log in to the Lumiform Desktop App.
-
Click on the profile icon in the upper right corner
-
Click on Profile
From here, you have the option to choose in which form you want to receive notifications. Since this article is about push notifications, make sure you have checked the box for "Push notifications".
Other options are email notifications and SMS notifications.
Very Important: Make sure that the checkbox for "Active" is checked. Only then will you receive messages from your user account.
Don't forget to click on "Update Profile"!
Now you have made all the settings that you can make to receive push notifications, at least technically. But are you still not receiving messages? Then it definitely has something to do with the scheduling of your templates.
Check your template scheduling settings
-
Go to Templates and click on the template you would like to schedule.
-
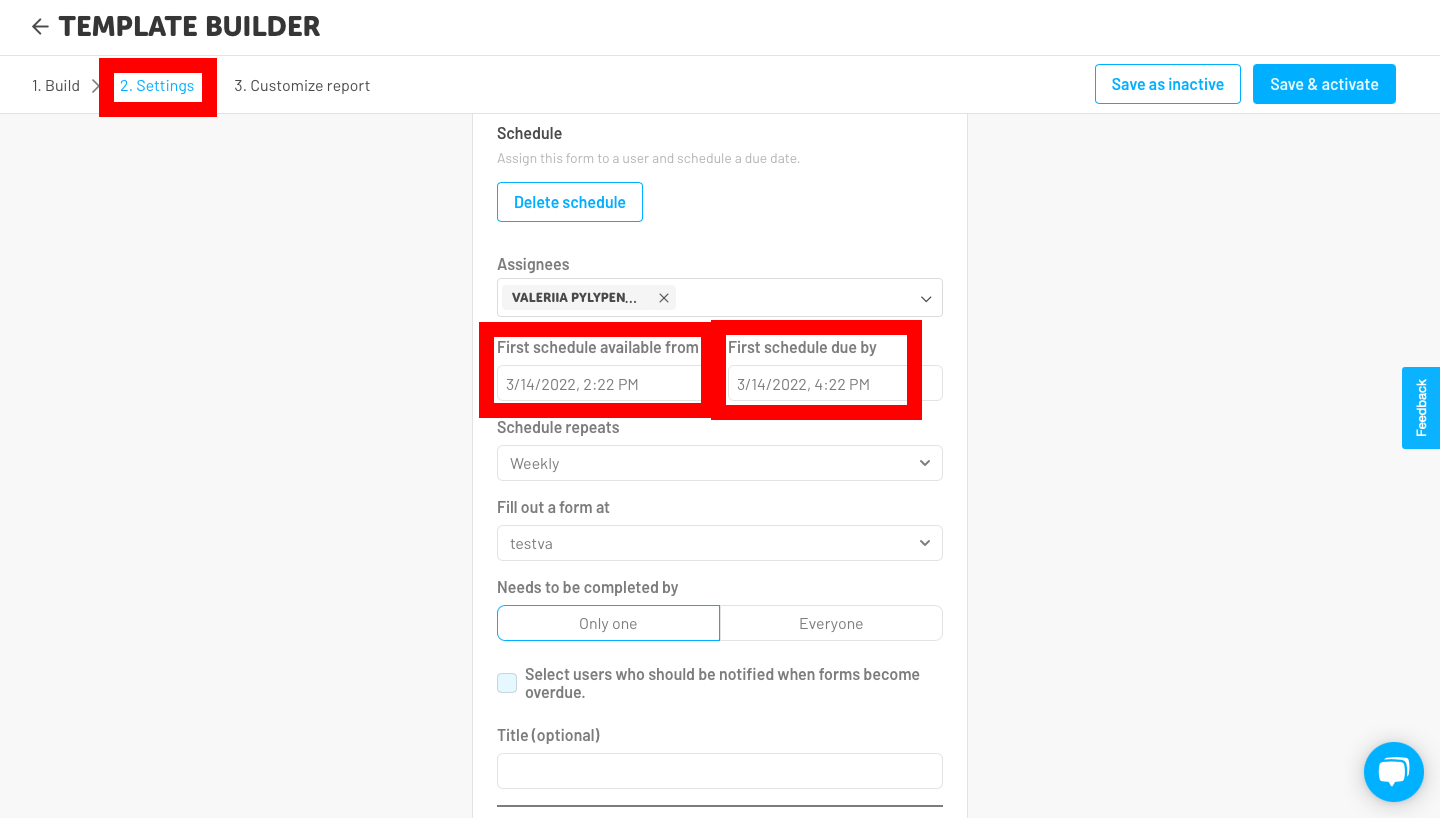
Go to step 2, "2. Assign."
-
Add a schedule to the check by clicking on "Yes, select user and time" at "Should a time frame be selected for the check?"
-
Select the users or groups you would like to assign your template to (Note: As written above, these users must be set to "Active". How to do that you will learn above)
-
Attention: Make sure that the first schedule ("First schedule available from") is in the future, and to be on the safe side, your first schedule should be at least 10 minutes away from the time when you click "Save & Activate" later.
-
Ensure that "First schedule due by" is after the first schedule, and there are at least 10 minutes between the two schedules.
-
Set up the rest of the missing information like interval, site, conducted by one or each
-
Pro Tip: give your schedule a title for better clarity

From here, you don't need to do anything but click "Save & Activate" on the upper right corner for your schedule to be active.
Again & important: Please ensure that the first schedule is always in the future (after your template is activated). To be on the safe side, you should start the schedule at least 10 minutes after the current time!
If you still have problems, don't hesitate to contact us via live chat.


